Remote Control
Take control of computers across your network, or across the world. Remote Control allows you to control a PC as if you were there. Includes a blazing fast search to find computers quickly
Product Links
News And Tips
Profile Generator Manual
IntelliAdmin Profile Generator simplifies the process of setting up new Microsoft Exchange users on your network.
It supports Microsoft Outlook XP, 2003, 2007, and 2010, on Microsoft Windows 2000 or higher.
Getting Started – Pick your options and download your custom copy.
Most Profile generator settings are not configured via command line arguments.
Instead, visit our download page to select the options you need. The downloaded file will be customized to work with your network settings.
Visit the download page here:
http://www.intelliadmin.com/index.php/outlookprofilegeneratordownload/
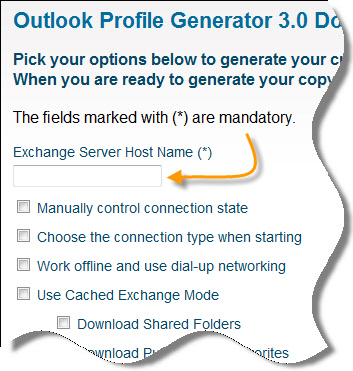
Most of the settings are optional, but make sure to enter the host name of your exchange server:

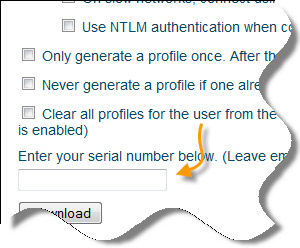
Also, if you have purchased Profile Generator, don’t forget to enter your serial number:

Testing it out
Once you have downloaded the software, copy it to a test machine where you have logged in as a user for the first time, and no Microsoft Exchange profile has been setup.
From the command line, run it like this:
ProfileGenerator.exe
If it is a trial version, a purchase screen is displayed.
In the background it has sent a message to Outlook to generate the profile.
That is important – A profile will not be actually generated until the moment Outlook has been launched. If you look at the mail settings in the control panel, you won’t see anything there until after Outlook has run at least once.
Now if we launch Microsoft Outlook it will already be setup. There are no additional settings for the user to configure.
Once you have tested it out, and are satisfied with how your profiles are being created, then add it to the users logon script.
If you need help setting up a logon script, visit this page to see how:
Tips
Profile Generator does not make any changes until after Oulook is run.
Steps to updating a profile:
-Run Profile Generator
-Run Outlook
-Only then will you see a change in the control panel
Remembered contacts, and signatures can get cleared out in some versions of Outlook each time a profile is created. To keep this from happening configure Profile Generator to run only once, or pick the update option.
To get it to run once, select the “Only generate a profile once. After that, calls to profile generator will do nothing” option on the download page.
Keep in mind that when this option is selected, profile generator will only execute once. After that no changes will be made after it executes. You can reset it to run again by calling profile generator with the /clear command line argument
Example:
ProfileGeneratorTrial.exe /clear
To get it to only update the default profile, select the “Update if profile exists, otherwise create a new one.” option on the download page.
Another special situation is when you want to specify a different user than the one for the current profile. In this case we have the username Steve that we want to see in outlook instead of the current one.
ProfileGeneratorTrial.exe /user "Steve"
If you already have downloaded Profile Generator, and can’t remember what settings you used, then call it from the command line with the /debug argument:
ProfileGeneratorTrial.exe /debug
It will output all the configured settings.
Command Line Arguments
All of the settings that are built into the Profile Generator download can be overridden via command line arguments.
Here are all of the possible options:
/ServerName: [host] - Name of the server
/ConnectionManual: Yes/No - Manually control the connection state
/ChooseConnectionType: Yes/No - Choose the connection type when starting
/WorkOffline: Yes/No - Work offline and use dial-up networking
/UseCachedMode: Yes/No - Use Cached Exchange Mode
/DownloadSharedFolders: Yes/No - Download Shared Folders
/DownloadPublicFavorites: Yes/No - Download Public Favorites
/EncryptData: Yes/No - Encrypt data between Outlook Exchange
/AlwaysPromptForLogon: Yes/No - Always prompt for logon credentials
/PickProfile: 1 = Don''t Change, 2 = Do not pick, 3 = Pick a Profile
/HTTPEnabled: Yes/No - Connect to Microsoft Exchange using HTTP
/HTTPServer: [host] - HTTP Server (Do not include http://
/HTTPUseTCPFast: Yes/No - Fast connections use HTTP first
/HTTPUseTCPSlow: Yes/No - Slow connections use HTTP first
/HTTPUseNTLM: Yes/No - Use NTLM authentication
/HTTPSSLOnly: Yes/No - Connect using SSL Only
/HTTPMutuallyAuth: Yes/No - Mutually authenticate the https session
/HTTPPrincipalName: [Name] - Principal Name for proxy server
/ProfileUpdate: {1,2,3,4} -
1 = Update a profile if it exists, otherwise create a new one
2 = Always create a new profile
3 = Always create a new profile, delete all other profiles
4 = Create a new profile, only if one does not exist
/RunOnce: Yes/No - Only generate a profile once
/ProfileName: [Name] - Set the name of the profile
Finally, if you still need help please feel free to email us at support@intelliadmin.com

